The Step-by-Step Guide to Setting Your Blog Up for SEO Success
One of the most common questions we get asked from companies and individuals starting to explore content marketing and SEO is:
“How should I set up my blog?”
And honestly, we wish we got the question more. Too often do we see sites putting out good content on a regular basis, but failing to get search traffic because they’re not set up well!
How you set up your blog has a huge impact on whether or not you succeed at SEO. With a well-set-up blog, it’ll be much easier, and faster, to get your articles ranked. With a poorly set-up blog, you could spend years creating content and never see any of it on the front page of Google.
So whether you’re thinking of starting a blog, or already have one up and running, it’s worth taking the time to step back and make sure that you have it set up for success.
In this guide, I’ll walk you through the four main areas you need to focus on:
- Hosting your blog
- Setting up your blog’s back end
- Optimizing your blog’s front end
- Adding some final touches
By the end, you’ll have a good sense of whether or not your blog is set up properly to capture search traffic, and what to do when you’re setting up your next blog.
Hosting Your Blog
How you host your blog is the most important consideration, but it’s the one that so many people go with the easiest solution for.
There are three main groups of ways you can host your blog:
Unhosted: Where you don’t need to worry about hosting at all. These are providers like Medium, Squarespace, Shopify and WordPress.com.
DIY Host: Where you set up the hosting and pay a tiny fee to keep your site there. These are providers like GoDaddy, BlueHost and HostGator.
Managed Host: Where you pay more for someone else to manage all of your hosting for you. These are providers like WPEngine, Flywheel and CloudOptimus.
In 90% of cases, use WordPress on a managed host.
WordPress is going to be easy for you and your team to get set up on, it’ll be familiar to people you have work on the blog in the future, it’ll be easy for you to give your writers accounts on, and it doesn’t need any design or technical skills.
Most of the managed hosts will get everything set up for you — once they send you a login you’re good to go. They’re responsive by email, can fix things quickly, can make small changes you want and will generally make your life much better.
This advice might seem strange if you’ve looked at other hosting advice. Why aren’t I recommending BlueHost or GoDaddy like everyone else?
Why You Shouldn’t Use a DIY Host (like BlueHost, GoDaddy, etc.)
The reason you see sites like BlueHost get recommended so much is that they pay over $100 per person you refer to them.
If you look at Pat Flynn of Smart Passive Income’s monthly reports, he made over $27,000 referring people to BlueHost in December 2017:
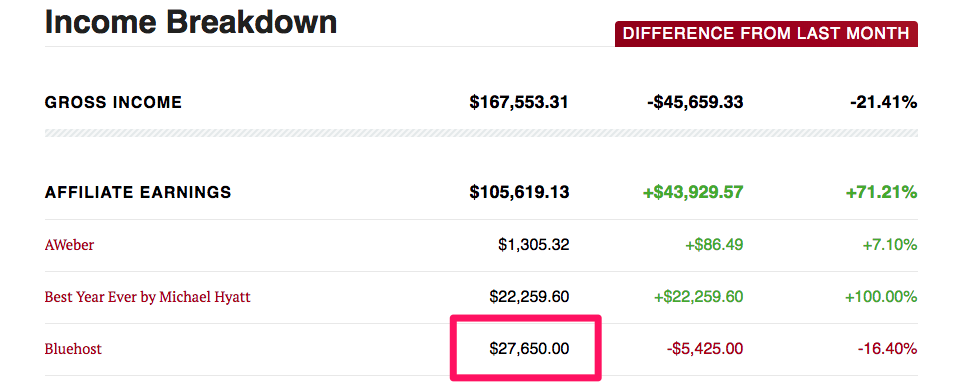
That’s a ton of money, and most higher-end hosting providers can’t afford to pay that much. And the ones that can, like WPEngine, have a much lower conversion rate since they cost so much more.
Think about it like this: You can refer your readers to a site where they only have to pay $3 a month and you make $100-plus, or to a site where they have to pay $35 and you make $200. The first commission rate is lower, but the conversion rate will be much higher, which is why bloggers recommend BlueHost.
So new bloggers sign up for BlueHost, then when they get popular and want to monetize their blog…they start recommending BlueHost. It’s a great marketing strategy for BlueHost, but it makes you worse off since you end up being their customer.
But why is it so bad to use DIY hosts? You get what you pay for. A host that you’re only paying $3 a month to has no incentive to keep you happy or keep your site healthy, and when things go wrong, they’ll usually tell you to figure it out yourself.
And since they provide limited security, it’s not hard to end up in a situation where your site gets hacked, and they simply shut your account down and tell you that you have to pay $1,000 to get it back and cleaned up.
(Yes, this happened to me).
That’s not a fun situation to be in. If you want to avoid it, your best option is to go with a managed host that’s slightly more expensive but will give you peace of mind knowing someone else is on top of your security, handling your maintenance and ready to help if things break.
Why You Shouldn’t Use an Unhosted Provider (Medium, Shopify, WordPress.com, Wix, etc.)
The problem with completely done-for-you blogs like Medium, Shopify, and WordPress.com is how little control you have over your site.
The amount of control you get will vary, but it will almost always be less than the control you get by hosting the blog yourself and using a completely customizable blogging tool like WordPress.org.
Medium, in particular, severely limits what you can do from an SEO perspective, and may actually lead to worse results since they host everything on their own domain. More on Medium here.
Shopify and WordPress.com are a bit better, but you’ll still likely run into limitations fairly quickly and need to switch later, so you may as well start with the more full-featured option of WordPress on a managed host.
One Other Option: Webflow
Now despite everything I just said, I don’t use WordPress. I prefer to use Webflow, since it gives much easier control over editing the design and functionality of your site, while keeping it lighter-weight, faster and better maintained.
But there are some downsides. You need to be very familiar with HTML, CSS and possibly JavaScript to use it to its fullest. It’s not going to “just work” out of the box like WordPress, so for many people, it’ll end up being inconvenient.
That said, if you do want to get something even better than WordPress and are willing to learn a bit of the coding and design side, Webflow is also a great solution, and what we build our own sites on.
Blog.url.com? Or Url.com/blog?
However you decide to host your blog, the last big question is whether or not you want your blog on a subdomain (blog.url.com), or on the root domain in a subdirectory (url.com/blog).
There is no perfect answer. But there are a few questions you can ask yourself to figure it out.
Is your site primarily focused on content? Then put it on the subdirectory, or even skip the subdirectory (like url.com/article-title). Examples: this blog, Ridester, my personal blog, A Clean Bake, Self-Publishing School.
Does your site have many non-content pages, like products? Then put it on a subdomain so that you can keep the two sites separate more easily. Examples: Kettle and Fire, Perfect Keto, Spire.
Is your site a webapp where most of the experience is “hidden” from the public URLs? Then it’s up to you, but I’d put it on a subdomain so that you have easier control over the design, backend and other features of the CMS. Examples: Fomo, Patreon, Asana.
Once you’ve decided on how and where you’re going to host your site, the next step is to make sure the back end of it is properly configured so that you can optimize it for SEO.
Setting Up Your Blog’s Backend
For this explanation, I’m going to stick to WordPress since that’s what I recommended for most people in the first section. If you want to use Webflow, their guide is a good place to start, but I’ll write a more in-depth one later.
The back end of your blog is everything “behind the scenes” that the reader doesn’t experience, but that you want to configure to give yourself the best chance at ranking well for high value keywords.
This includes:
- Custom Metadata
- Google Analytics
- Google Webmaster Tools
- Caching
- Content Delivery Network
1: Custom Metadata
Metadata is the HTML code that tells Google, Facebook, Whatsapp and anywhere else your blog is linked what’s on the page.
When you look at a Google result, you typically see a…
Title

Description

Date

URL
Each piece of metadata tells your potential reader something about the post they’re considering reading.
You need to make sure you’re able to change these, since you want to control how your site shows up in Google.
Changing the Title and Description
The easiest way to set the title and description is to install a plugin to manage it for you, like Yoast. This adds a small section at the bottom of each post where you can change the title and description to whatever you want:
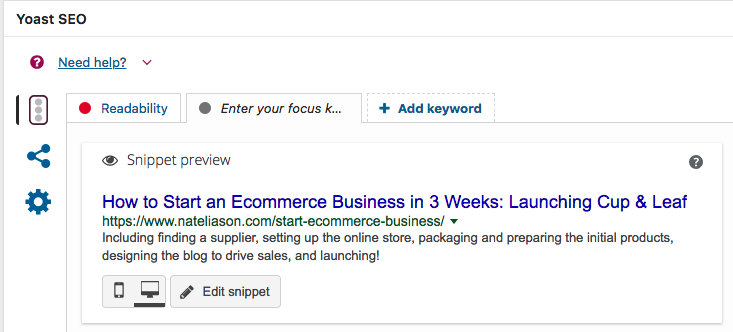
By clicking on “Edit snippet” you can change how your site appears to Google.
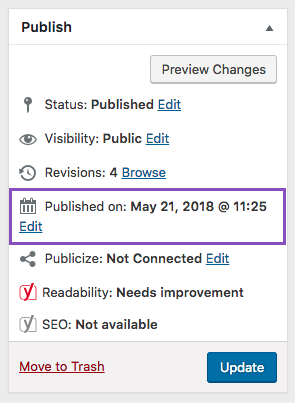
Changing the Date
The date for a WordPress site comes from the “published on” date in the article.
If you want to change how this date shows up in Google, you’ll need to change when the post was actually published, which you can do in the “Publish” box.
Changing the URL
You can also change how your URL appears from within the Yoast editor, but the easier solution is to change how your site’s URL structure is set up so that it naturally looks clean and clear in Google.
If you’re using a subdirectory, then you should have a simple structure like:
www.url.com/blog/post-title
Or for a subdomain:
blog.url.com/post-title
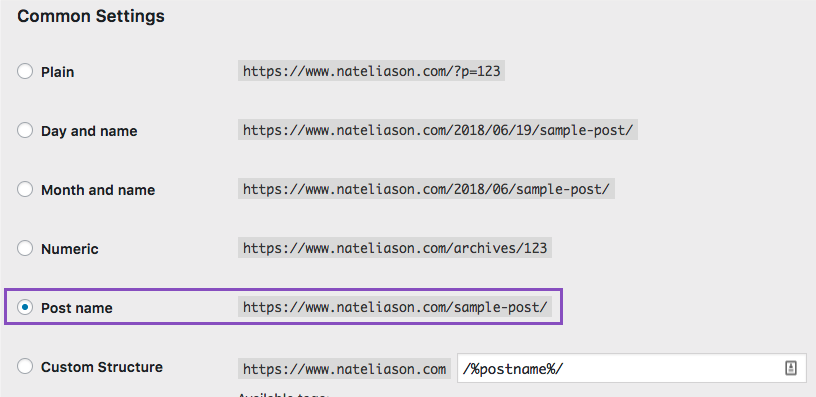
In WordPress, you need to enable this option, otherwise it’ll give you a weird slug (the part after the www.url.com) like “?p=430”.
To make that change, go to Settings –> Permalinks and then change the “Common Settings” to Post Name:
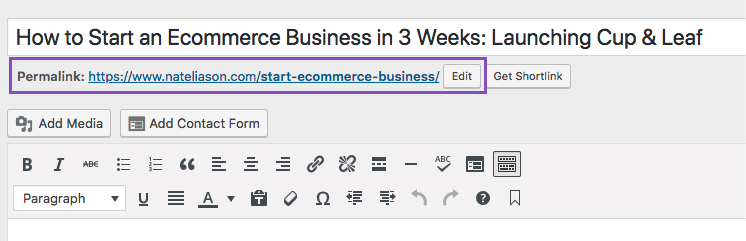
Then whenever you write a post, you can change the slug from right in the post editor:
2: Google Analytics
You can’t grow your site very well if you don’t know what people are and aren’t reading, and the best way to do that is to set up Google Analytics.
They explain the steps of setting it up well enough in their onboarding so I won’t go into it too much here, but just know that even if you don’t think you need the analytics now, set them up anyway. You’ll be glad you have all the historical data later in the future when you want to go back and look at it.
In the early days of your content marketing strategy, the analytics won’t matter too much — you’ll just be focused on putting out content.But as time goes on and you gain more traffic, you’ll want to know what’s going on in your site.
3: Google Webmaster Tools
Hand in hand with Google Analytics is Google Webmaster Tools. You’re even less likely to use this in the early days of your site, but once again, set it up now so you don’t regret it later.
The big benefit of Webmaster Tools is that it will alert you if Google thinks there’s an issue with your site, especially if there’s an issue that might be hurting your search traffic. Without having Webmaster Tools setup, you could have one of these issues for months without ever knowing it.
Another benefit is that Webmaster Tools will let you easily see what pages are starting to rank well as you refine your SEO strategy. This can be a key tool in getting your old content to rank higher.
4: Caching
Caching is a way for your site to save a “picture” of each page that it can deliver to new visitors without having to run as much on-site code, letting new visitors load pages much faster.
By setting it up, you ensure that your site is loading as fast as possible, but many sites neglect it. If you use a managed host like WPEngine or CloudOptimus they’ll handle all of this for you, and Webflow does it automatically as well, but if you decided to DIY then you’ll need to implement this.
The easiest way is to set up WP Super Cache by following the guide here.
5: Content Delivery Network (CDN)
The last big thing you’ll want to set up on the back end is a Content Delivery Network, which allows your site to be “delivered” from a server near to wherever someone is trying to access it from.
This, again, speeds up your site load time considerably, and will improve the user experience for people visiting your site.
Once again, if you use a managed host or Webflow this is all done for you so you can skip ahead (see why it’s worth paying a bit more?). If you’re doing DIY hosting, you’ll need to set it up yourself, using something like Cloudflare.
With the core parts of the back end set up, you’re ready to focus on the front end of the site.
Optimizing the Front End of Your Site
Having the back end hooked up isn’t enough — you also need to make sure that the experience on your site is conducive to people sticking around and reading your blog.
If they don’t, then they’re unlikely to share or recommend it, and you’re unlikely to see any significant traffic from it.
To do that, we’ll cover a few main topics:
- Make sure your blog is mobile friendly
- Audit your site’s page speed
- Optimize your images
- Make sure you have plenty of internal linking
1: Make Sure Your Blog Is Mobile Friendly
As of 2018, around half of all web traffic is coming from mobile devices. If your site sucks to read on mobile, it’s not going to perform very well. Simple as that.
There are two pieces to this: how your site appears on mobile, and how quickly it loads on mobile. Speed of loading we’ll cover in the next point, so for now let’s focus on how your blog looks on mobile.
If you’re using a WordPress theme, you hopefully don’t have to worry about this too much, but it doesn’t hurt to check. Pull out your phone, borrow a friend’s phone, get an iPad and test your website out on as many different screen sizes as possible.
Hopefully there are no issues. If there are, you may need to adjust the CSS for the site yourself, or hire someone to help you change it.
2: Audit Your Site’s Page Speed
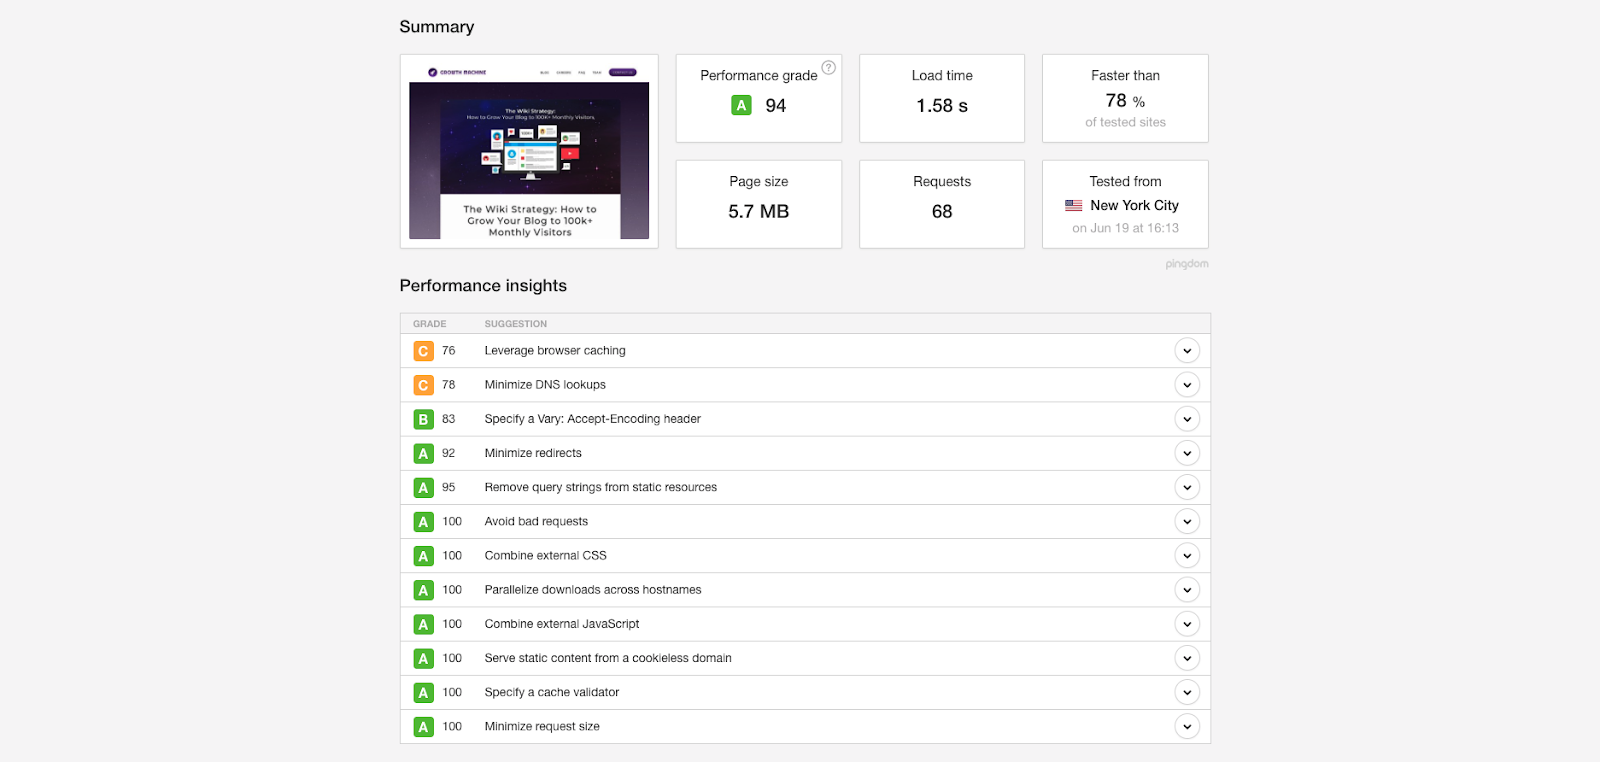
One of the biggest factors in having a good user experience is how fast your page loads. You ideally want to get it under two seconds, one second if possible.
The best way to check this is to use a free tool like Pingdom’s Page Speed Tester, which will run an audit on any URL you give it and tell you what you could fix to get it faster.
This is a pretty good score, for example:
Once you know what needs to be fixed, you can either try to do it yourself, ask your managed hosting provider to fix it or hire someone on Upwork who knows how to implement the change for you.
3: Optimize Your Images
Speaking of page speed, optimize your images to make sure your pages load quickly and without the awkwardness of images loading seconds after the page has opened.
If you upload images without doing anything else to them, you’ll frequently run into issues where you’ve uploaded a 2000 x 3000 pixel image for a container that’s only 700 pixels wide. In that case, you’ve uploaded an image that’s eight times bigger than it needs to be, making it harder for people to load your site.
That might not be a huge deal when you only have one or two images, but if you have an image-heavy post like this one, it might mean the difference between a 1-2 second load time and a 5-6 second load time.
If you use a managed hosting provider, most will take care of this for you (noticing a trend?), as will Webflow. If you use a DIY provider, you’ll want a tool like EWWW Image Optimizer to help you out.
The best way to find out if you need to look into this is if when you run your speed test in step 2, the images are one of the big things slowing down your load times. When that’s the case, they’re probably unoptimized and slowing your page down as a result.
You may also find that you need to do this by running a technical audit of your site through a tool like Ahrefs or Website Auditor.
4: Make Sure You Have Plenty of Internal Linking
The last thing you want to make sure you do on the front end of your site is to internally link your content religiously.
This means taking whatever opportunity you can to link from one article to another, as well as to link to the most important parts of your site from the header and footer.
This can be as simple as featuring a few of your key links, as we do in our header:

And you can go out and link to all of your core pages in the footer, like Webflow does:
Either way, make sure that every page on your site is linked to from at least one other page, if not more. That helps crawlers like Google find everything that’s on your site, and helps new readers get around, too.
Getting Started
Whether you already have a blog and need to get it fixed up, or you’re starting a new blog from scratch, go through the main steps in this guide to ensure that your site is built to facilitate getting organic search traffic.
Once that’s done, you can explore the other posts in this series to start getting more traffic.